``
Hello and welcome to week 5 of ESPM 112L-
Metagenomic Data Analysis Lab!
- Introduction
- Your binning results
- DAS_Tool
- Interpreting DAS Tool
- Uploading your bins to ggKbase
- Today’s Turn-In
Introduction
Automatic binning
The objective of automatic binning (often shortened to autobinning) is the same as the process you used last week to separate out genome bins from a metagenomic assembly, just done computationally rather than manually. It’s very convenient- if you have a bunch of samples. Manual binning is very time consuming and sometimes not effective. Automatic binning has some caveats, though, since a human isn’t there to proofread and curate the binning result. That’s your job!
This week, I’ve run one automatic binning program for you - Metabat (https://peerj.com/articles/1165/) and MaxBin2 (https://pubmed.ncbi.nlm.nih.gov/26515820/). Your task today is going to be to use the results from these binning algorithms, as well as the results from your manual binning last week, to make a consolidated bin set using DASTool.
Bin consolidation
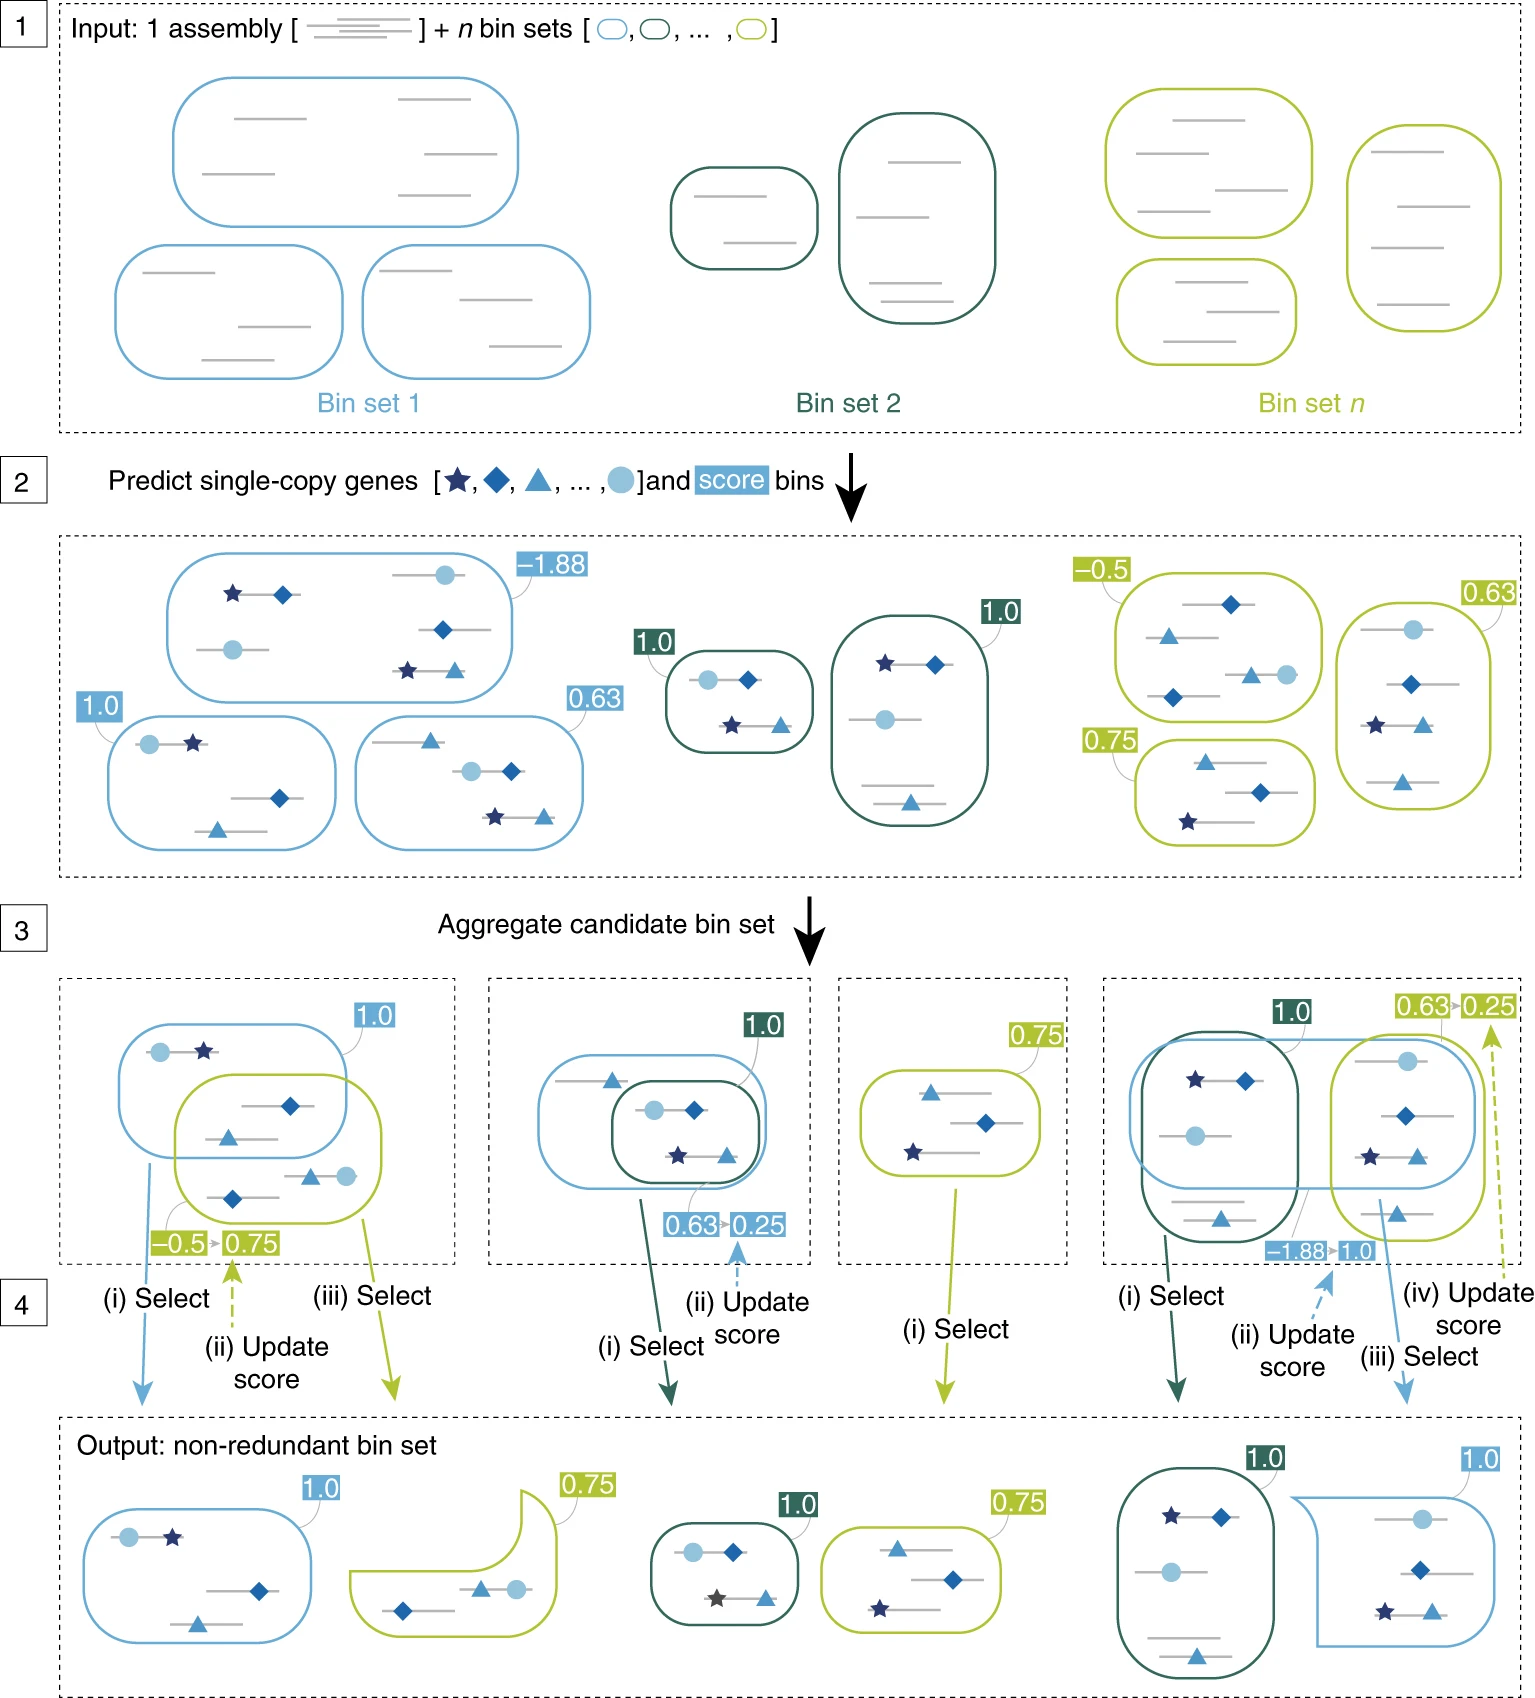
Different binning approaches use different features to separate out genomes. Your manual ggkbase binning, for example, used GC content, coverage and taxonomy; most of these autobinners will use coverage and k-mer composition (essentially a way to turn a DNA string into a numeric vector for computers to interpret).

But not every autobinner is the same- they differ in algorithms and the features they look at. As a result, binners will give results of varying quality on individual datasets. Take a look at how three binners (CONCOCT, MaxBin2, and Metabat2) perform on the same dataset, and then what bins look like after consolidation with DASTool:

You can see that the consolidated bins are overall of much higher quality than the bins generated by any individual binning method shown. And that’s what we’re going to do today!
Your binning results
In the interest of time, and because of computational constraints, I’ve run two binners (again, MaxBin2 and Metabat) for you. DASTool takes as input a file called a scaffolds2bin file; this is a file that shows which scaffold belongs to which bin. Each binner has different contig assignments- they make different decisions on which bins the contigs should be placed in- and so we generate a scaffolds2bin file for each binner.
In the directory for your sample (/class_data/assemblies/[YOUR SAMPLE NAME HERE]) there should be a folder called binning. Navigate there, and you’ll see four important files: your contigs file, a scaffolds2bin.tsv file for Metabat, a scaffolds2bin.tsv file for MaxBin2, and a scaffolds2bin.txt file from ggKbase (with the results from your binning last week).
Now what you need to do is use this information to run DAS_Tool.
DAS_Tool
DAS_Tool is, like all software you’ll use in lab, already installed on the class server. Open the help menu by running DAS_Tool -h, and take a look at the options. (Remember, if you’re ever running software on the command line and you’re confused about how to use it, try running that command with -h; almost all the time, it’ll show a help menu. Sometimes you need to use --help or something similar, but that’s down to the individual program.)
Making an output directory
But remember, you can’t write to folders within the class_data folder, so you need to include an output flag that specifies to output in your home directory. Remember, we refer to that with ~; if you’re student20, ~ means /home/student20. For me, ~ means /home/jwestrob.
First, make a folder called DAS_Tool in your home directory, like so:
mkdir ~/Das_Tool
Input
Important: Explainer
The following subsections show how to structure individual pieces of the DAS_Tool command. Scroll down to the section labeled “The Final Dastool Command” to see how they’re strung together.
As you can see from the help menu, DAS_Tool needs two main inputs: -i, a comma-separated list of scaffolds2bin files, and -c, the contigs file to create your bins from. Here’s an example of the list you need to make-
Navigate (cd) to your sample directory (/class_data/assemblies/[sample_id]) which will contain the following files:
MetaBat.scaffolds2bin.tsv
ggKbase.scaffolds2bin.tsv
First thing we’re going to do is copy these over to your directory. Try the following commands:
#Navigate to your sample directory
cd /class_data/assemblies/[sample_id]

#Make a folder in your home directory to put the files in
mkdir ~/DAS_Tool

#Copy the right files to your new directory
cp *scaffold_min1000.fa *.tsv ~/DAS_Tool

#Navigate to that folder
cd ~/DAS_Tool
Great! Now that you have all your files set up, let’s go take a look at all the individual parts of the command.
Input
Your new directory (~/DAS_Tool) should look something like this:
Cow_8_s24_scaffold_min1000.fa   Cow_8_s24_maxbin.scaffolds2bin.tsv
Cow_8_s24.scaffolds_to_bin.tsv  Cow_8_s24_metabat.scaffolds2bin.tsv
You have one fasta format file here (Cow_8_s24_scaffold_min1000.fa) containing your DNA from your assembly, and three scaffolds2bin.tsv files containing the information on which scaffolds belong to which bins.
The fasta file you will provide to DAS_Tool with the -c flag, and the scaffolds2bin files you will provide together, as a comma-separated list, with the -i flag.
Now, given these three scaffolds2bin.tsv files, you would provide the following as -i for DAS_Tool:
-i Cow_8_s24_metabat.scaffolds2bin.tsv,ggKbase.scaffolds_to_bin.tsv
And for our contigs file, we provide the path:
-c Cow_8_s24_scaffold.fa
Remember, you should have copied this fasta file (as well as the scaffolds2bin files) over to a folder in your home directory ~/DAS_Tool, which is where you should be running the command. If you get issues saying that DAS_Tool can’t find your scaffolds file, try using ls to make sure you’re in the same directory as that file, and that it’s spelled correctly in your command!
Output
You should be running this in a folder in your home directory (e.g. ~/DAS_Tool or similar). Make sure you’ve navigated to that directory with cd before running. Now specify the prefix of your output. All the files DAS_Tool makes will start with this prefix; name it whatever you want, just don’t name it something that will confuse you later!
-o DAS_Tool
The Final Dastool Command
When you run DAS_Tool, you need to use the version I’ve installed locally. There’s some funny stuff going on with the cluster software. Make sure you point to /home/jwestrob/DAS_Tool instead of just typing DAS_Tool.
cd /class_data/assemblies/Cow_8_s24/

#Remember to make a new directory to run DAS_Tool
mkdir ~/DAS_Tool
cp *scaffold_min1000.fa *.tsv ~/DAS_Tool

#Navigate there and run the command
#I did not!! Provide the correct file names! Don't copy paste this!!
cd ~/DAS_Tool
/home/jwestrob/DAS_Tool -i maxbin2.scaffolds2bin.tsv,metabat.scaffolds2bin.tsv,JS_HF3_S142_scaffolds2bin.tsv -c Cow_8_s24scaffold_min1000.fa -o DAS_Tool
Interpreting DAS Tool
In that output directory, ~/Das_Tool, you’re going to see a bunch of files, but only two are important for your purposes. Here’s an example of what you’ll see:
LC_0.1_DAS_DASTool_hqBins.pdf              LC_0.1_DAS_proteins.faa
LC_0.1_DAS_DASTool.log                     LC_0.1_DAS_proteins.faa.archaea.scg
LC_0.1_DAS_DASTool_scaffolds2bin.txt       LC_0.1_DAS_proteins.faa.bacteria.scg
LC_0.1_DAS_DASTool_scores.pdf              LC_0.1_DAS.seqlength
LC_0.1_DAS_DASTool_summary.txt             LC_0.1_DAS_vamb.scaffolds2bin.tsv.eval
LC_0.1_DAS_metabat.scaffolds2bin.tsv.eval
You want the files ending in DASTool_scores.pdf, DASTool_hqBins.pdf, and DASTool_scaffolds2bin.txt. We’re going to use the first to examine how well your binners worked, and the second to upload the new bins to ggKbase.
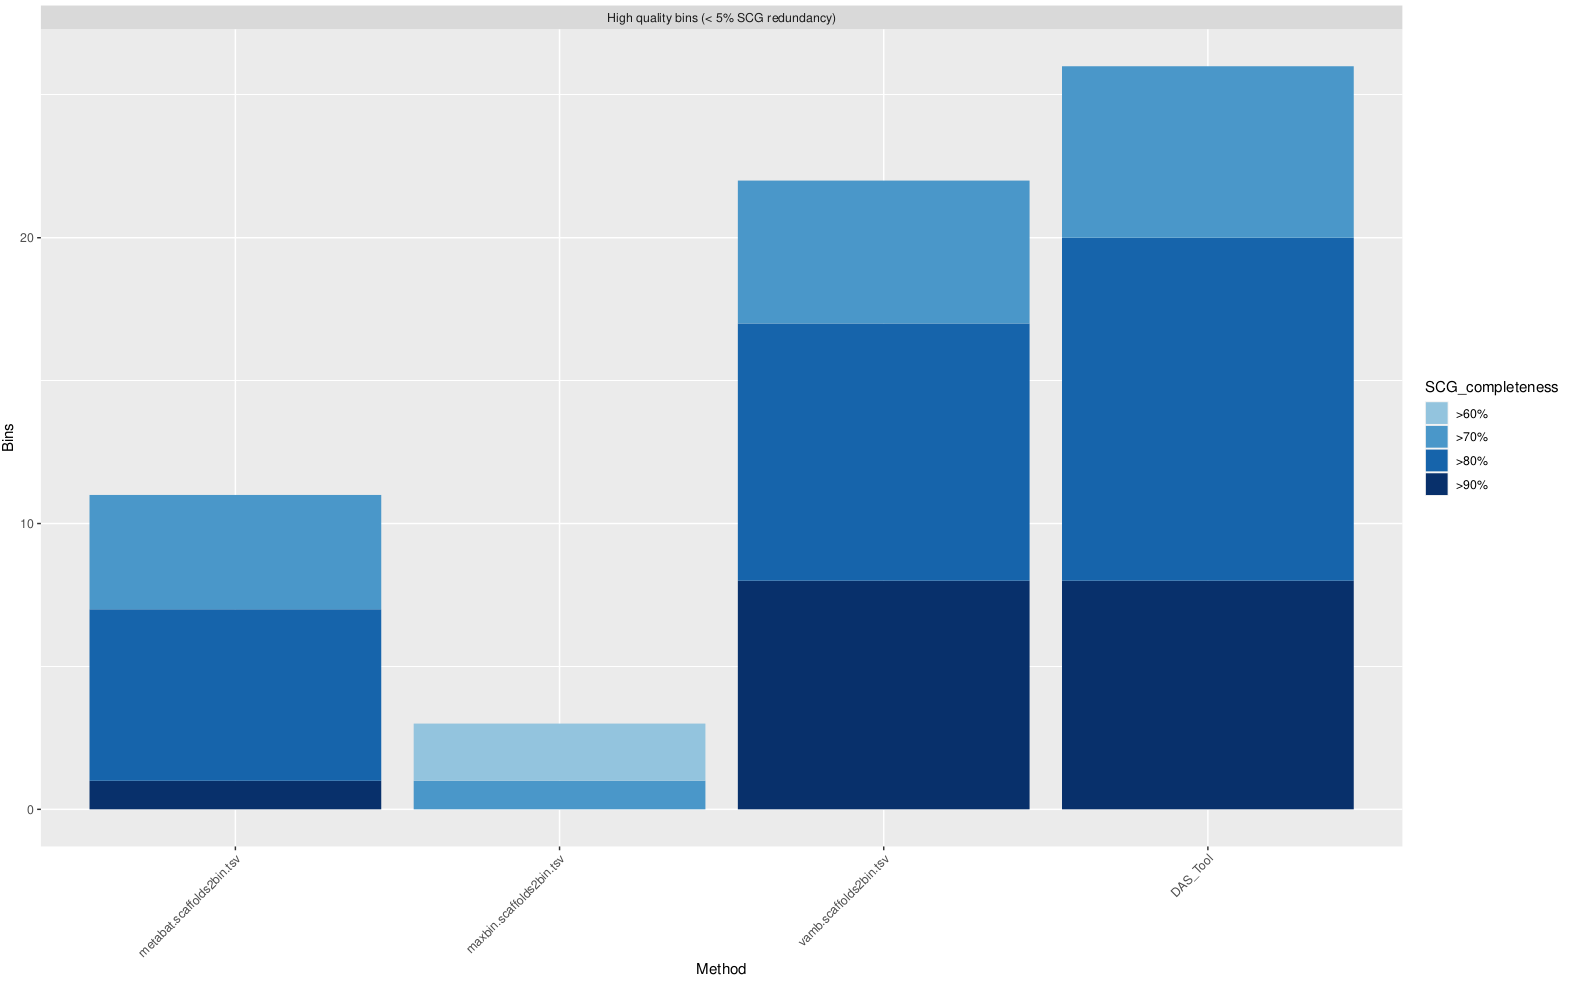
Download those files (using cyberduck or your favorite alternative), and open up the DASTool_hqBins.pdf file to take a look. You’ll see something like this:

which shows the number of bins each binner generated, as well as how complete these genomes are estimated to be.
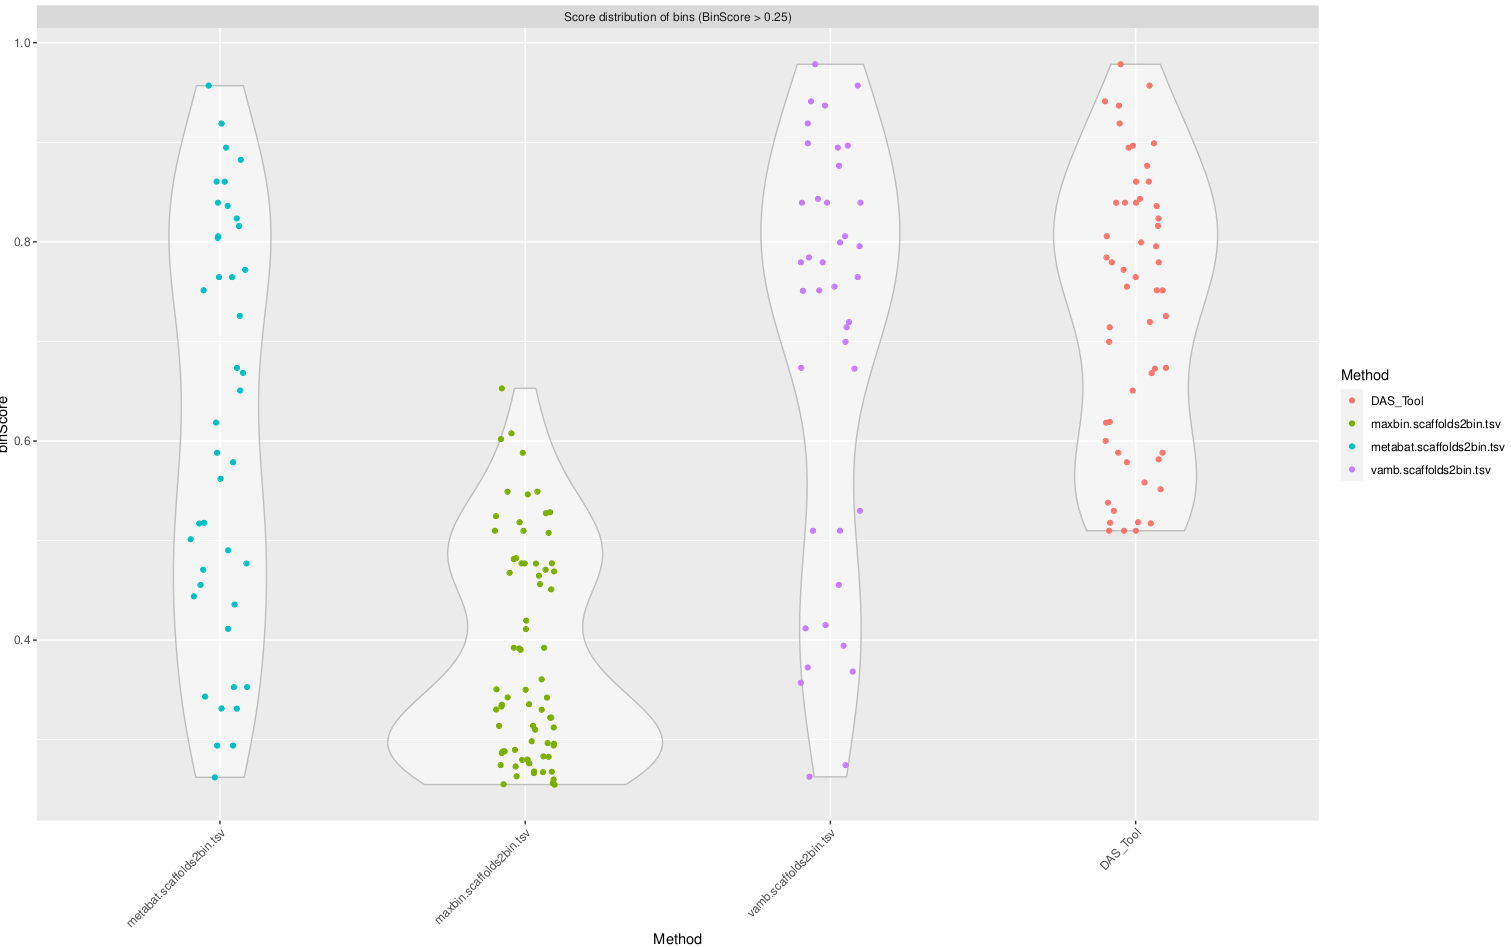
Now take a look at the file ending in DASTool_scores.pdf, and you’ll see something like this:

Notice how DASTool tends to consolidate and eliminate the lower-quality bins, and has a much higher quality score cutoff than the other binners. Most binning software doesn’t even take completeness into account, which is why you tend to see binning results that yield numerous low-quality bins.
Now let’s take your shiny new set of bins and upload them to ggKbase.
Uploading your bins to ggKbase
Go to class.ggkbase.berkeley.edu and go ahead and log in. Head over to your project page and select ‘View Organisms’, as you did last week. Up at the top right corner, you’ll see a blue wrench icon that says ‘Batch Rebinning’; click on it and select ‘Rebin File’.

Now, select ‘Add file’, upload that file, and press ‘Upload and Rebin’. Wait a moment, and all your new DASTool bins will be ready for you to peruse!
Today’s Turn-In
-
What is the highest coverage bin in your sample?
-
What is the taxonomy of that organism?
-
How do the genomes generated by manual binning on ggkbase compare to the automatically generated bins in terms of quality? How about the DAS_Tool generated bins?